Thumbprint Cookies
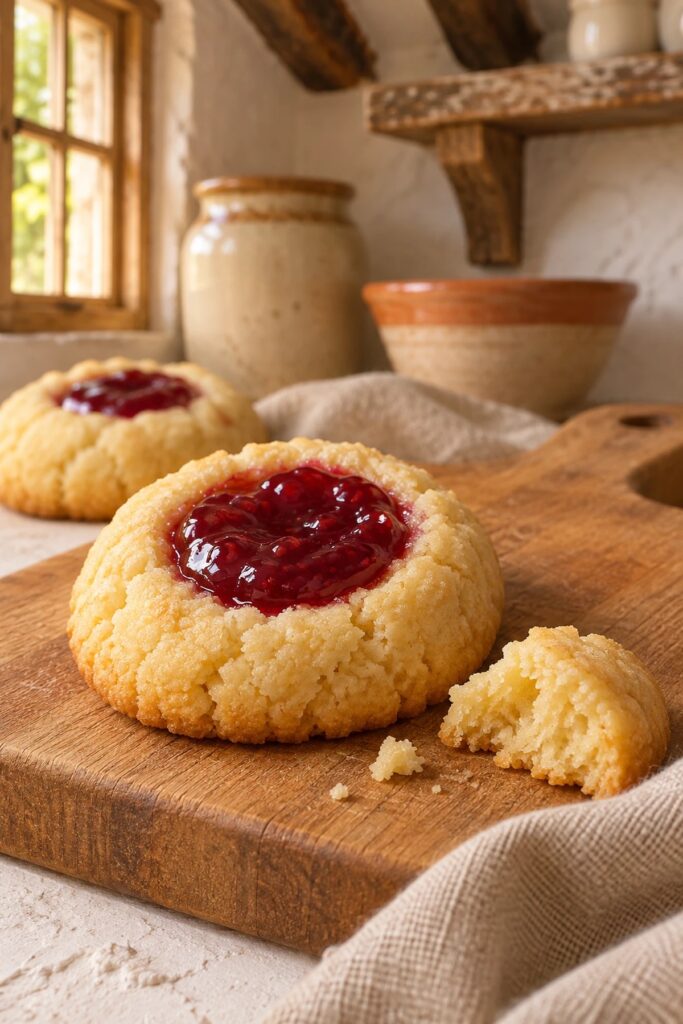
Thumbprint cookies are tender, buttery shortbread-style cookies with a small well pressed into the center and filled with glossy jam, and they bake in about 12 minutes. The edges turn lightly golden, the middle stays soft and the jam sets into a sweet, slightly tart jewel.
The idea is as simple as the name. You roll a ball of buttery dough, press your thumb into the middle, spoon in a little jam and bake. There is no rolling pin, no cookie cutter and no frosting, so a tray of thumbprint cookies is one of the easiest homemade cookies you can make.
What makes them special is the contrast. The dough is rich with butter and egg yolks, so it melts in your mouth, while the jam adds a fruity, bright note that keeps every bite from tasting too heavy.
The recipe uses 7 everyday ingredients, takes about 25 minutes of hands-on work and makes 30 cookies. That makes this thumbprint cookies recipe a good fit for holiday cookie trays, cookie swaps, baby showers and any afternoon when you want a little something with your tea.

Why You’ll Love These Thumbprint Cookies
Only 7 ingredients. Butter, sugar, egg yolks, vanilla, salt, flour and jam are all you need. There is no baking powder or baking soda, so the cookies stay dense, tender and shortbread-like.
No special tools. You can mix the dough with a hand mixer, a stand mixer or even a wooden spoon, and your thumb does the shaping. A cookie scoop makes the balls even, but a tablespoon works too.
Pretty without effort. The bright jam in the middle makes every cookie look like it took hours. Pick raspberry for a ruby-red center or apricot for a golden one.
Easy to make ahead. You can shape the dough a couple of days before baking, and the baked cookies keep well, which makes thumbprint cookies ideal for busy holiday weeks.

Perfect For
Thumbprint cookies are a classic for Christmas cookie trays and cookie exchanges, but they work all year long. Make them for Easter brunch, Mother’s Day, a baby shower, a bridal tea or a simple weekend treat. You can swap the jam to match the season, with strawberry in spring and cranberry or raspberry in winter.
They also travel well. The cookies are sturdy enough to stack in a tin and small enough to share, which makes them a thoughtful homemade gift. If you are planning a bigger holiday dessert table, you will find more ideas on my Holiday Recipes page.

Thumbprint Cookies at a Glance
| Flavor | Buttery and lightly sweet, with a fruity jam center |
| Texture | Soft, tender and crumbly, like shortbread |
| Difficulty | Easy |
| Prep Time | 25 minutes |
| Chill Time | 30 minutes |
| Bake Time | 12 to 14 minutes per sheet (about 25 minutes total) |
| Total Time | 1 hour 20 minutes |
| Servings | 30 cookies |
| Method | Baking |
| Cuisine | American |
| Best For | Holiday cookie trays, gifts and tea-time treats |
Before You Start
Soften the butter. Take the butter out of the refrigerator about an hour ahead. It should give slightly when you press it but still hold its shape, not look shiny or greasy.
Weigh the flour if you can. Too much flour makes thumbprint cookies dry and crumbly, and too little makes them spread. If you use cups, spoon the flour into the cup and level it off instead of scooping.
Plan the chilling. The shaped cookies need 30 minutes in the freezer before baking. Chilling keeps the well from closing and the cookies from spreading.
Have the jam ready. Use a thick jam or preserves. If the jam is very firm, stir it well in a small bowl so it spoons easily.
What Makes These Thumbprint Cookies Work
Egg Yolks for Richness
Using only the yolks adds fat and richness without extra moisture. That gives thumbprint cookies a soft, tender crumb that holds together when you press the center, instead of a puffy, cakey one.
No Leavening, So the Well Stays
There is no baking powder or baking soda in this dough. Without leavening, the cookies do not puff up, so the shape you press in stays put in the oven and holds the jam.
Chilling Before Baking
Cold butter melts more slowly in the oven, which keeps the edges neat and the center well deep. Roll the dough between your palms to warm and smooth it, because cracks in the ball widen when you press, so a smooth ball makes a smooth well.
Ingredient Notes and Substitutions
Thumbprint cookies use a short ingredient list, so each ingredient matters. Here is what to look for and which swaps work.
Butter. Use unsalted butter, so you control the salt. Salted butter varies by brand and can make the cookies taste too salty.
Sugar. Granulated sugar gives a tender cookie with lightly crisp edges. Powdered sugar can replace part of it for an even more delicate crumb, but this recipe is written for granulated sugar.
Egg yolks. Use large yolks at room temperature so they blend smoothly into the butter. Save the whites for meringue cookies or scrambled eggs.
Vanilla. Pure vanilla extract gives the best flavor. You can replace half a teaspoon with almond extract for a bakery-style note.
Flour. Plain all-purpose flour works best. Weigh it or spoon and level it, since packed flour makes the dough dry.
Jam. Choose a thick jam or preserves, such as raspberry or apricot. Runny jelly can bubble over, and chunky preserves do not fit in the well, so puree or strain them first. Seedless jam is a good choice if you do not like seeds.
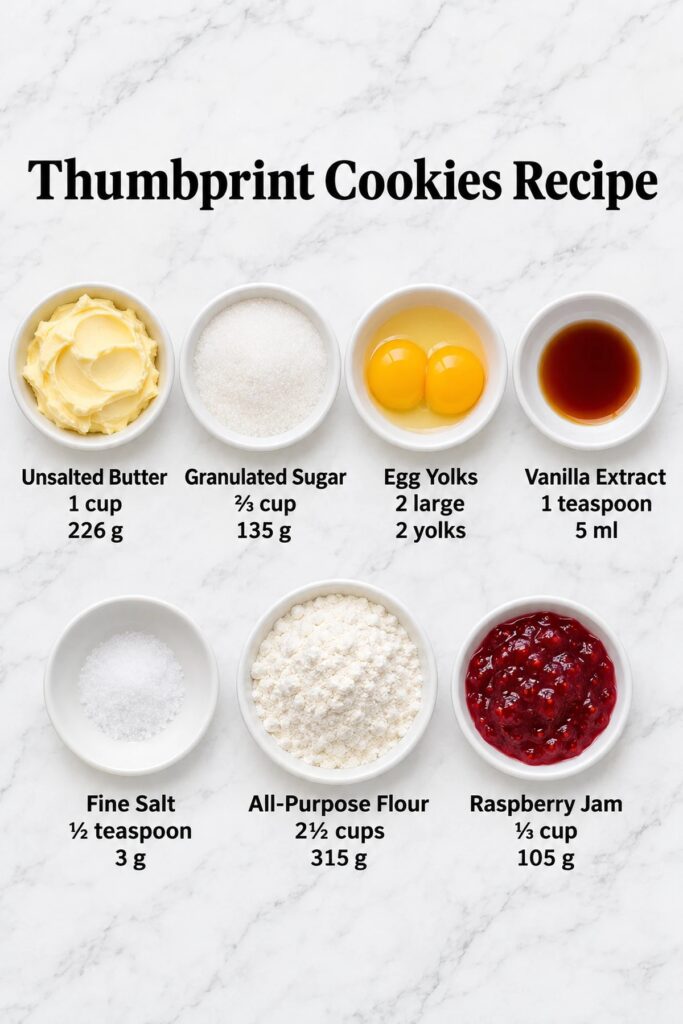
Ingredients for Thumbprint Cookies
These amounts make about 30 thumbprint cookies.
- 1 cup (226 g) unsalted butter, softened
- ⅔ cup (135 g) granulated sugar
- 2 large egg yolks, at room temperature
- 1 teaspoon pure vanilla extract
- ½ teaspoon fine salt
- 2½ cups (315 g) all-purpose flour
- ⅓ cup (105 g) thick raspberry or apricot jam
Kitchen Equipment Needed
• Stand mixer or hand mixer – creams the butter and sugar
• Large mixing bowl – for the dough
• 1-tablespoon cookie scoop – makes evenly sized balls
• 2 baking sheets – hold the cookies while they chill and bake
• Parchment paper – keeps the bottoms from sticking
• Teaspoon or your thumb – for pressing the wells
• Small bowl and spoon – for stirring and filling the jam
• Kitchen scale – weighs the flour accurately
• Wire rack – for cooling the cookies
How to Make Thumbprint Cookies
Here is how to make thumbprint cookies, from the buttery dough to the last spoonful of jam.
Step 1: Cream the Butter and Sugar
Beat the softened butter and sugar in a large bowl for 1 to 2 minutes, just until creamy. You do not need to whip it light and fluffy, because extra air makes the cookies puff and spread.
Step 2: Add the Yolks, Vanilla and Salt
Add the egg yolks, vanilla and salt and beat until the mixture is smooth and combined. Scrape down the bowl once so nothing stays hidden at the bottom.
Step 3: Mix in the Flour
Add the flour in two or three additions on low speed and mix just until no dry streaks remain. The dough looks crumbly at first, then comes together into a soft dough that holds when you squeeze it. Stop mixing as soon as it does.
Step 4: Scoop and Roll the Balls
Scoop level tablespoons of dough and roll each one between your palms into a smooth ball. Place the balls on parchment-lined baking sheets, about 2 inches apart. If the dough feels too dry to hold a ball, knead in 1 tablespoon of milk.

Step 5: Press the Thumbprints
Press your thumb or the rounded back of a teaspoon gently into the center of each ball, about halfway down. Wiggle it slightly to make a wide, round well. If the edge cracks, pinch the dough back together and press again.

Step 6: Chill the Cookies
Freeze the sheets for 30 minutes, or refrigerate them for 1 hour. While they chill, heat the oven to 350°F (175°C). Never put chilled dough on a warm baking sheet, because the butter will melt before the cookie sets.
Step 7: Fill with Jam
Stir the jam in a small bowl until loose. If it is very firm, microwave the jam for 5 to 10 seconds, just until it is no longer firm, so it spoons easily into the dents. Fill each well with about ½ teaspoon of jam, until it is full but not overflowing.

Step 8: Bake
Bake one sheet at a time for 12 to 14 minutes, until the edges are set and the bottoms are lightly golden. The tops stay pale, and the jam looks glossy and set around the edges.
Step 9: Cool
Let the thumbprint cookies cool on the baking sheet for 10 minutes, since they are fragile while warm. Move them to a wire rack to cool completely, then let the jam set before you stack or store them.
How to Know They’re Done
Use these checkpoints at each stage. They tell you when the dough, the wells and the baked cookies are ready, so you do not have to guess.
| What to Check | Ready When |
|---|---|
| Creamed butter | Creamy and smooth, but not light and fluffy |
| Dough | Soft and crumbly at first, then holds together when squeezed |
| Dough balls | Smooth, without cracks, and about the size of a tablespoon |
| Wells | Round and about halfway down, with no cracks around the edge |
| Baked edges | Set, with lightly golden bottoms and pale tops |
| Jam | Glossy and set, not bubbling over the edge |
If the bottoms turn dark brown before the edges set, your oven runs hot, so lower the temperature by 25°F next time. If the cookies spread flat, chill the next batch longer and check that the baking sheet is completely cool.
Tips for the Best Thumbprint Cookies
Do not overmix the dough. Stir only until the flour disappears. Too much mixing makes thumbprint cookies tough instead of tender.
Roll the balls smooth. Cracks in the ball get bigger when you press. Warm the dough between your palms until the surface looks smooth.
Chill before you fill and bake. The chilled dough holds its shape in the oven, so the well stays deep and the edges stay neat.
Do not overfill the wells. About ½ teaspoon of jam per cookie is enough. Too much jam bubbles over and burns on the sheet.
Bake one sheet at a time. A single sheet in the center of the oven browns evenly, and each sheet starts on a cool pan.
Common Mistakes and How to Fix Them
These are the mistakes that most often hurt thumbprint cookies, along with the quick fix for each one.
| Skipping the chill The butter melts fast, the cookies spread and the wells close. | Freeze the shaped cookies for 30 minutes before filling and baking. |
| Using too much flour The dough turns dry and the cookies crumble apart. | Weigh 315 g of flour, or spoon and level it, and knead in 1 tablespoon of milk if the dough is dry. |
| Pressing cracked dough balls The cracks widen into splits that leak jam. | Roll each ball until smooth and pinch any cracks closed before pressing. |
| Overfilling with jam The jam bubbles over and burns on the pan. | Use about ½ teaspoon per cookie and fill to the rim, not above it. |
| Baking on a warm sheet The butter melts early and the cookies flatten. | Let the baking sheet cool completely between batches. |
Variations
Once you know the base recipe, these easy changes keep thumbprint cookies interesting.
Sugar-Coated Thumbprint Cookies
Roll each ball in granulated sugar before pressing the well. The sugar gives the cookies a lightly sparkly, crisp edge.
Nut-Rolled Thumbprint Cookies
Roll the balls in very finely chopped pecans or walnuts before shaping. The nuts add a toasty crunch that goes well with jam.
Lemon or Almond Thumbprint Cookies
Add up to 1 teaspoon of lemon zest to the dough, or replace half a teaspoon of the vanilla with almond extract. Both pair well with raspberry or apricot jam.
Chocolate Thumbprint Cookies
Bake the cookies without filling, press the wells again with a teaspoon while they are still warm and let them cool. Then fill each well with melted chocolate or ganache.
Glazed Thumbprint Cookies
Whisk powdered sugar with a little milk and drizzle the cooled cookies with the glaze for a prettier tray.
Serving Suggestions
Serve thumbprint cookies at room temperature with a cup of hot tea, coffee or a glass of cold milk. Arrange them on a plate with a light dusting of powdered sugar, or tuck them into a cookie tin lined with parchment for gifting.
If you love cookie trays, try them next to my Linzer cookies, spritz cookies, snowball cookies and gingerbread cookies. You can find more ideas in my 10 best Christmas cookies roundup.
For other classics, bake a batch of sugar cookies, peanut butter blossom cookies or chocolate chip cookies, and spoon your favorite homemade strawberry jam into the centers.
Storage
Store thumbprint cookies in an airtight container at room temperature for up to 5 days. Place parchment between the layers so the jam does not stick to the cookie above.
The cookies are fragile, so keep them in a single layer or in a sturdy tin. If your kitchen is warm, store them in the refrigerator and bring them to room temperature before serving.
If you want to bake ahead, cool the cookies completely first. The University of Missouri Extension’s guide to freezing baked goods recommends separating layers of cookies with freezer paper before they go into the freezer.
Freezing
Thumbprint cookies freeze well, both as baked cookies and as dough. Freeze the baked cookies in an airtight container with parchment between the layers for up to 3 months, then thaw them at room temperature for a few hours.
To freeze the dough, shape and press the cookies without filling and freeze them on a sheet until solid. Transfer them to a freezer bag for up to 3 months. Fill them with jam and bake from frozen, adding 2 to 3 minutes to the bake time.
Frequently Asked Questions
Why are my thumbprint cookies cracking?
The dough is usually too dry or too cold. Roll the balls between your palms until they are smooth, and knead in 1 tablespoon of milk if the dough crumbles.
Why did my thumbprint cookies spread?
Warm butter, a warm baking sheet or skipping the chill are the usual causes. Chill the shaped cookies for 30 minutes and always bake on a cool sheet.
Do I fill thumbprint cookies before or after baking?
This recipe fills them before baking, after the cookies are chilled, so the jam sets as they bake. If you prefer a fresh jam topping, bake the cookies, press the wells again while warm and fill them once they are cool.
What is the best jam for thumbprint cookies?
A thick jam or preserves, such as raspberry or apricot, works best. Avoid runny jelly, and puree or strain chunky preserves so they fit in the well.
Can I make thumbprint cookies without egg yolks?
The yolks give the dough its richness and tender crumb, so I recommend keeping them. For a different flavor, you can try the nut-rolled or sugar-coated variations.
Can I make thumbprint cookies ahead of time?
Yes. Shape the cookies and refrigerate them, unfilled and tightly wrapped, for up to 2 days, then fill and bake. You can also bake them and store them for up to 5 days.
Can I freeze thumbprint cookies?
Yes. Freeze the baked cookies for up to 3 months with parchment between the layers, or freeze the unfilled dough balls and bake them from frozen.
Final Thoughts
Thumbprint cookies prove that a short ingredient list can still make something special. The dough comes together in one bowl, your thumb shapes the cookies and a spoonful of jam turns each one into a pretty little treat.
Once you have made a batch, you will know how soft the dough should feel and how deep the wells should be, and these thumbprint cookies become the recipe you reach for whenever a cookie tin needs filling.
Which jam went into yours, and did you roll the dough balls in sugar or keep them plain? Tell me in the comments.
If you try this recipe, please leave a star rating along with your comment below. It takes a few seconds and helps other readers find the recipe.

Thumbprint Cookies
Thumbprint cookies are tender, buttery cookies with a small well in the center filled with sweet, glossy jam. This thumbprint cookies recipe uses just 7 ingredients, chills for 30 minutes, bakes in about 12 minutes per sheet and makes 30 cookies. They have the soft, crumbly bite of shortbread, which makes them a must-have for holiday cookie trays, tea parties, or anytime you want something sweet.
Ingredients
- 1 cup (226 g) unsalted butter, softened
- ⅔ cup (135 g) granulated sugar
- 2 large egg yolks, at room temperature
- 1 teaspoon pure vanilla extract
- ½ teaspoon fine salt
- 2½ cups (315 g) all-purpose flour
- ⅓ cup (105 g) thick raspberry or apricot jam
Instructions
- Beat the softened butter and sugar for 1 to 2 minutes, just until creamy.
- Add the egg yolks, vanilla and salt and beat until smooth.
- Add the flour on low speed and mix just until no dry streaks remain and the dough holds together.
- Scoop level tablespoons of dough and roll into smooth balls. Place them 2 inches apart on parchment-lined baking sheets.
- Press a thumb or the back of a teaspoon into the center of each ball to make a well, pinching any cracks closed.
- Freeze the sheets for 30 minutes (or refrigerate for 1 hour). Meanwhile, heat the oven to 350°F (175°C).
- Stir the jam until loose and fill each well with about ½ teaspoon.
- Bake one sheet at a time for 12 to 14 minutes, until the edges are set and the bottoms are lightly golden.
- Cool on the sheet for 10 minutes, then move to a wire rack to cool completely.
Notes
- Chill the dough: Freeze the shaped cookies for 30 minutes before baking so the wells hold and the cookies do not spread.
- Measure the flour: Weigh 315 g, or spoon and level the cups. Knead in 1 tablespoon of milk if the dough is dry.
- Use thick jam: Choose thick jam or preserves, such as raspberry or apricot, and fill the wells with about ½ teaspoon each.
- Cool before moving: Cool on the baking sheet for 10 minutes, since the cookies are fragile while warm.
- Storage: Store in an airtight container at room temperature for up to 5 days, with parchment between the layers.
- Freezing: Freeze baked cookies for up to 3 months, or freeze unfilled dough balls and bake from frozen, adding 2 to 3 minutes.
- Nutrition: Values are per cookie (1 of 30), made with unsalted butter and raspberry jam.
Nutrition Information:
Yield: 30 Serving Size: 1 cookieAmount Per Serving: Calories: 124Total Fat: 7gSaturated Fat: 4gCholesterol: 30mgSodium: 42mgCarbohydrates: 15gFiber: 0gSugar: 6gProtein: 1g