Peppermint Bark
Peppermint bark is the candy that looks like it came from a holiday shop window: a thin, glossy layer of dark chocolate, a smooth layer of white chocolate and a scatter of red-and-white peppermint that crackles when you bite it.
Four ingredients and a microwave are all it takes. You melt the dark chocolate and spread it thin, chill it until firm, then cover it with white chocolate and press crushed candy canes on top. Half a teaspoon of peppermint extract in each layer keeps the mint flavor clear instead of timid.
There is no baking, no candy thermometer and no tempering. The only skill involved is patience, because each layer has to firm up before the next one goes on, or the colors blur together.
This batch makes 24 pieces, which is just right for a gift tin, a cookie tray or a bowl on the counter during the holidays. It is also an easy project to hand to a child with a rolling pin and a bag of candy canes.

Why You’ll Love This Peppermint Bark
Four simple ingredients. Dark chocolate, white chocolate, candy canes and peppermint extract are all you need, and every one of them is easy to find in a regular grocery store in December.
No oven and no thermometer. The microwave melts the chocolate and the refrigerator sets it, so the whole recipe happens on one baking sheet.
A crisp snap and a creamy finish. The thin dark layer snaps cleanly, the white chocolate adds a creamy sweetness and the candy canes bring crunch and a cool minty bite.
Made for gifting. One pan makes about 24 pieces that pack neatly into tins and cellophane bags, and the bark keeps well, so you can make it days before you need it.

Perfect For
Peppermint bark belongs on every holiday dessert table, but it earns its place well beyond Christmas dinner. Pack it into cellophane bags for neighbors and teachers, tuck a few pieces into a cookie box, or set out a plate at a party where guests can snack with one hand.
It is also a good last-minute gift. The hands-on work takes about 30 minutes and the refrigerator does the rest, so it fits easily between other holiday baking. Leftover pieces are lovely broken over vanilla ice cream, stirred into hot cocoa or crumbled over a plain cheesecake.

Peppermint Bark at a Glance
| Flavor | Rich chocolate, creamy white chocolate and cool peppermint |
| Texture | Thin and snappy, with a crunchy candy cane topping |
| Difficulty | Easy |
| Prep Time | 15 minutes |
| Cook Time | 15 minutes (melting and spreading both layers) |
| Chill Time | 45 minutes |
| Total Time | 1 hour 15 minutes |
| Servings | 24 pieces |
| Method | Microwave, no bake |
| Cuisine | American |
| Best For | Christmas gifts, cookie trays and holiday parties |
Before You Start
Use chocolate made for melting. Bars, baking squares and wafers give the smoothest, snappiest bark. Chop them finely and evenly so the pieces melt at the same speed.
Keep everything dry. A drop of water or a puff of steam can turn melted chocolate thick and grainy. Dry the bowls, spatulas and cutting board completely before you start.
Line the pan first. A rimmed 10×15-inch baking sheet lined with parchment paper is the right size. Press the parchment flat so the bark lifts out in one piece.
Crush the candy canes before you melt anything. Once the white chocolate is spread, you have only a minute or two before the surface begins to set, and the candy has to go on right away.
What Makes Peppermint Bark Work
Thin Layers Give the Snap
Each layer is spread to about ⅛ inch, so the two layers together come to roughly ¼ inch. Thicker bark is hard to bite and breaks into rough chunks instead of clean pieces.
A Firm Dark Layer Keeps the Colors Clean
The dark chocolate has to be set before the white chocolate goes on. If it is still soft, the two layers swirl together and the sharp line between them disappears.
Cooled White Chocolate Protects the Base
White chocolate poured straight from the microwave is hot enough to re-melt the top of the dark layer. Five minutes of cooling keeps the layers distinct and still lets them bond.
Extract Adds Mint Without Extra Candy
A half teaspoon of extract in each layer carries peppermint flavor through the whole bite, not only where the candy canes sit. Adding much more can make the chocolate thick, so measure carefully.

Ingredient Notes and Substitutions
Dark chocolate: Semisweet or bittersweet both work. Semisweet makes a sweeter bark that suits children, while bittersweet gives a deeper contrast with the white layer. Chocolate in the 55 to 70 percent cacao range is a good place to start.
White chocolate: In the United States, white chocolate must contain at least 20 percent cocoa butter, so check the label for it. White baking chips made with other fats tend to set softer and taste waxy, so they make a less crisp bark.
Candy canes: Regular peppermint candy canes are the classic. Round peppermint candies or starlight mints, crushed the same way, work just as well. Aim for a mix of small and medium pieces.
Peppermint extract: Use pure peppermint extract, not peppermint oil, which is far more concentrated. If you prefer a milder bark, you can leave the extract out and let the candy canes provide all the mint.
Chocolate chips: Chips are made to hold their shape, so they melt thicker and set with less snap. If chips are what you have, stir 1 teaspoon of coconut oil or vegetable shortening into each bowl of melted chips to loosen them.
Ingredients for Peppermint Bark
For the Dark Chocolate Layer
- 12 ounces (340 g) semisweet or bittersweet chocolate, finely chopped
- ½ teaspoon pure peppermint extract
For the White Chocolate Layer
- 12 ounces (340 g) white chocolate, finely chopped
- ½ teaspoon pure peppermint extract
For the Topping
- ½ cup (about 60 g) crushed candy canes (about 5 regular candy canes)

Kitchen Equipment Needed
• Rimmed baking sheet, 10×15 inches
• Parchment paper
• 2 medium microwave-safe bowls
• Rubber spatula
• Offset spatula or the back of a spoon
• Sharp knife and cutting board
• Zip-top bag and rolling pin, for crushing the candy canes
How to Make Peppermint Bark
Step 1: Prepare the Pan and the Candy Canes
Line the baking sheet with parchment paper and press it flat. Unwrap the candy canes, put them in a zip-top bag, press out the air and crush them with a rolling pin into pieces ranging from coarse sand to pea size. Chop the dark and white chocolate finely and keep them in two separate, dry bowls.
Step 2: Melt the Dark Chocolate
Microwave the dark chocolate at 50 percent power, and heat it in 30-second bursts, stirring after each one. For 12 ounces this usually takes 3 to 4 minutes in total. Stop when only a few small pieces remain and keep stirring, since the heat in the bowl melts the rest. Stir in ½ teaspoon of the peppermint extract. The chocolate should be smooth, glossy and easy to pour.
If your microwave has no power setting, use full power and shorter 15 to 20 second bursts, stirring every time.
Step 3: Spread and Chill the Dark Layer
Scrape the chocolate onto the parchment and spread it with an offset spatula into a thin, even layer about ⅛ inch thick, roughly 9 by 13 inches. Tap the pan gently on the counter to level the surface. Refrigerate for about 15 minutes, until the chocolate is firm and has lost its wet shine.

Step 4: Melt and Cool the White Chocolate
When the dark layer has chilled for about 10 minutes, melt the white chocolate the same way: 50 percent power, 30-second bursts, stirring after each one. White chocolate scorches faster than dark, so stop as soon as it is nearly smooth. Stir in the remaining ½ teaspoon of extract. Let the bowl sit for about 5 minutes, stirring once or twice, until the chocolate feels barely warm and still pours easily.
Step 5: Spread the White Chocolate
Take the pan out of the refrigerator. Pour the white chocolate over the firm dark layer in ribbons, then spread it gently to the edges with the offset spatula, using long, light strokes so you do not drag the dark chocolate underneath. Aim for a layer about ⅛ inch thick.

Step 6: Add the Candy Canes and Chill
Work quickly while the surface is still soft. Scatter the crushed candy canes evenly over the white chocolate, including the corners, and press them in lightly with your fingertips so they stick. Refrigerate for about 30 minutes, until the bark is completely firm.

Step 7: Break the Bark into Pieces
Lift the parchment out of the pan and break the bark by hand into about 24 irregular pieces, each roughly 1½ to 2 inches wide. For neater pieces, let the slab sit at room temperature for 5 minutes, then cut it with a large, sharp knife.
How to Know It’s Done
Use these checkpoints from the first bowl to the final snap.
| What to Check | Ready When |
|---|---|
| Melted dark chocolate | Smooth and glossy, with no lumps, and easy to pour |
| Dark layer before the white goes on | Firm and matte, with no wet shine, and no mark left by a light touch |
| Melted white chocolate | Smooth, pourable and only barely warm to the touch |
| Candy cane topping | Pressed into the white chocolate and sitting level, not rolling around |
| Finished bark | Completely firm, lifts cleanly off the parchment and snaps in two instead of bending |
If the bark bends or the underside feels soft, return the pan to the refrigerator for 10 to 15 minutes. Pale streaks after chilling are usually bloom, which is cocoa butter that has risen to the surface. It looks dull but does not change the taste.
Tips for the Best Peppermint Bark
Stir gently. Whisking or stirring hard traps air bubbles that leave tiny pits in the surface of the bark. Slow, steady strokes with a rubber spatula keep it smooth.
Chill the dark layer only until firm. About 15 minutes is enough. A layer that is rock hard and very cold can stop the white chocolate from bonding to it. If that happens, let the pan sit at room temperature for 5 minutes.
Sift out the candy dust. The finest crumbs of crushed candy cane dissolve into the white chocolate and tint it pink. Shake the crushed candy through a sieve and keep the larger pieces for the top.
Use an offset spatula. Its angled blade spreads thin layers evenly without scraping the layer underneath. The back of a spoon works, but it takes a lighter hand.
Keep the bark on the parchment while it sets. Moving the pan around or lifting the slab too early can crack the layers apart.
Common Mistakes and How to Fix Them
| Mistake | How to Fix It |
|---|---|
| Letting water touch the chocolate A drop of water or steam turns melted chocolate thick and grainy. | Dry every bowl and spatula first. If the chocolate has already seized, it will not spread smoothly, so melt a fresh batch. |
| Pouring hot white chocolate over the dark layer The heat re-melts the top of the dark layer and the colors swirl together. | Cool the melted white chocolate for 5 minutes and spread it over a firm dark layer. |
| Melting at full power without stirring The chocolate scorches and turns clumpy. | Use 50 percent power in 30-second bursts, stir after each one and stop while a few small pieces remain. |
| Spreading the layers too thick The bark is hard to bite and breaks into rough chunks. | Spread each layer to about ⅛ inch, all the way to the edges. |
| Adding the candy canes too late The pieces sit on top instead of sticking, and fall off when you break the bark. | Sprinkle them on the moment the white chocolate is spread and press them in lightly. |
Variations
Marbled Peppermint Bark
Spread the dark layer, then pour the white chocolate over it while the dark chocolate is still soft. Drag a skewer through both to make swirls, scatter the candy canes on top and chill as usual. You get one marbled layer instead of two clear ones.
Milk Chocolate Peppermint Bark
Replace the dark chocolate with the same weight of milk chocolate for a sweeter, milder base. Milk chocolate is softer, so give the first layer an extra 5 minutes in the refrigerator before adding the white chocolate.
Cookie Crunch Peppermint Bark
Sprinkle ¼ cup of finely crushed chocolate sandwich cookies over the white chocolate along with the candy canes. The cookie crumbs add a darker crunch and a little extra contrast on top.
Serving Suggestions
Break the bark into shards for a dessert platter, or stack pieces on a plate beside gingerbread cookies and sugar cookies. Add a few meringue cookies and you have a holiday cookie tray with three different textures.
For a candy platter, pair it with saltine cracker toffee, chocolate dates and homemade peanut butter cups. For gifting, layer pieces between sheets of parchment in a tin, or tuck them into cellophane bags tied with ribbon.
Peppermint bark is also lovely with a warm drink. A mug of hot apple cider suits a cold afternoon, and a piece dropped into hot cocoa melts into a minty drink. If you enjoy making chocolate treats at home, try these homemade chocolate bars next.
Storage
Store the bark in an airtight container with parchment paper between the layers. It keeps at cool room temperature for up to 1 week, or in the refrigerator for up to 2 weeks. If you refrigerate it, leave the lid on until the container reaches room temperature, so condensation does not form on the candy canes.
Freezing
Freeze the bark in a freezer-safe container with parchment between the layers for up to 2 months. Thaw it, still covered, in the refrigerator overnight, then let it come to room temperature before opening the container.
Frequently Asked Questions
Can I use chocolate chips for peppermint bark?
Yes, but chips are made to hold their shape, so they melt thicker and the bark sets with less snap. Stir 1 teaspoon of coconut oil or vegetable shortening into each bowl of melted chips and spread the layers thin.
Why did my chocolate get thick and grainy?
Almost always water. Even a drop from a damp bowl or a bit of steam makes melted chocolate seize. Overheating can do the same. Use dry tools, melt gently in short bursts and stir after each one.
Why do the layers peel apart?
The dark layer was probably too cold and hard when the white chocolate went on, or it had condensation on the surface. Chill the dark layer for only about 15 minutes, and if the surface looks damp, let it sit at room temperature until it dries before spreading the white chocolate.
How do I crush candy canes without making a mess?
Unwrap them, seal them in a sturdy zip-top bag with the air pressed out and tap with a rolling pin until the pieces are the size you want. Double the bag if the plastic is thin.
Can I make peppermint bark ahead of time?
Yes. It keeps for about a week at cool room temperature and up to 2 weeks in the refrigerator, so it is a good make-ahead recipe for gifts and holiday trays.
Why is the white chocolate layer soft or streaky?
A soft layer usually means the bark needs more time in the refrigerator, or that white baking chips were used instead of real white chocolate. Pale streaks are bloom, which affects the look but not the flavor.
Can I leave out the peppermint extract?
Yes. The candy canes will still give you a mild peppermint flavor, and the bark will taste more like chocolate. The extract is what carries the mint through the chocolate itself.
Final Thoughts
Peppermint bark shows that a candy can be simple and still look festive. Two thin layers of chocolate, a handful of crushed candy canes and a little patience give you something that looks as if it came from a confectionery shop.
Once you know the rhythm of melting, spreading and chilling, it becomes a recipe you can make from memory every December. Swap the chocolate, swirl the layers or add cookie crumbs, and the method stays exactly the same.
Did you keep your layers neat or swirl them together, and who got the first shard from the pan? Tell me in the comments.
If you try this recipe, please leave a star rating along with your comment below. It takes a few seconds and helps other readers find the recipe.
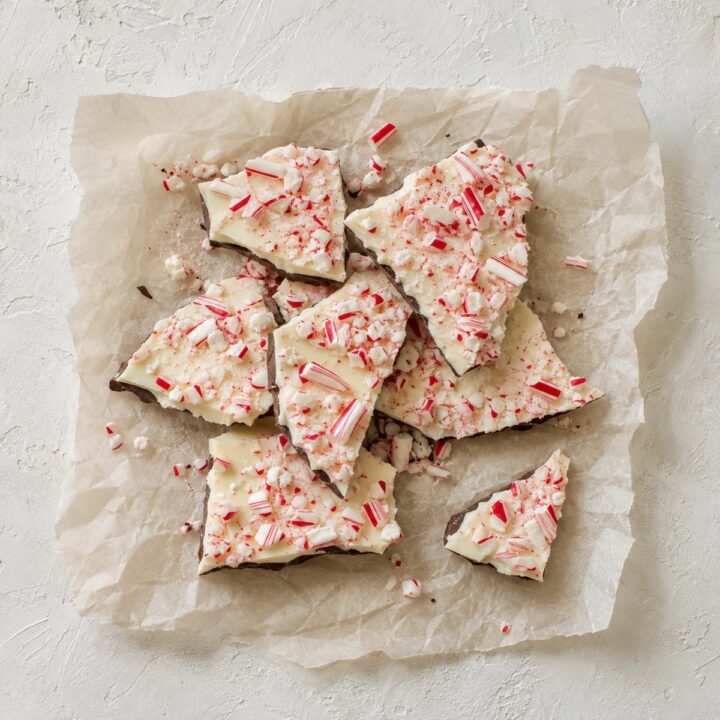
Peppermint Bark
This peppermint bark is a crisp, two-layer holiday candy with a snappy dark chocolate base, a creamy white chocolate top and a crunchy scatter of crushed candy canes. You melt the chocolate in the microwave, spread each layer thin and chill it until it breaks into clean pieces. Ready in about 1 hour 15 minutes with 4 ingredients, this peppermint bark makes 24 pieces for gift tins, cookie trays and parties.
Ingredients
For the Dark Chocolate Layer
- 12 ounces (340 g) semisweet or bittersweet chocolate, finely chopped
- ½ teaspoon pure peppermint extract
For the White Chocolate Layer
- 12 ounces (340 g) white chocolate, finely chopped
- ½ teaspoon pure peppermint extract
For the Topping
- ½ cup (about 60 g) crushed candy canes (about 5 regular candy canes)
Instructions
- Line a rimmed 10×15-inch baking sheet with parchment paper and press it flat. Unwrap the candy canes and crush them in a zip-top bag with a rolling pin into pieces from coarse sand to pea size. Chop both chocolates finely and keep them in separate dry bowls.
- Melt the dark chocolate in a microwave-safe bowl at 50 percent power in 30-second bursts, stirring after each one, until smooth with only a few small pieces left to melt by stirring, usually 3 to 4 minutes. Stir in ½ teaspoon of the peppermint extract.
- Scrape the dark chocolate onto the parchment and spread it into a thin, even layer about ⅛ inch thick, roughly 9 by 13 inches. Refrigerate for about 15 minutes, until firm and no longer shiny.
- When the dark layer has chilled for about 10 minutes, melt the white chocolate the same way, stirring after each burst. Stir in the remaining ½ teaspoon of extract, then let it cool for about 5 minutes, until barely warm and still pourable.
- Pour the white chocolate over the firm dark layer and spread it gently to the edges in a layer about ⅛ inch thick, without dragging the dark chocolate underneath.
- Immediately scatter the crushed candy canes over the white chocolate and press them in lightly. Refrigerate for about 30 minutes, until completely firm.
- Lift the bark out on the parchment and break it by hand into about 24 irregular pieces, each roughly 1½ to 2 inches wide.
Notes
- Chocolate: Use bars, baking squares or wafers made for melting, chopped finely. If you use chips, stir 1 teaspoon of coconut oil or vegetable shortening into each bowl of melted chips.
- Melting: Heat at 50 percent power in 30-second bursts, stirring after each one, and stop while a few small pieces remain. With no power setting, use full power in 15 to 20 second bursts.
- Layers: Chill the dark layer for about 15 minutes, until firm and matte. Cool the melted white chocolate for 5 minutes so it does not melt the layer underneath.
- Thickness: Spread each layer to about ⅛ inch on a 10×15-inch pan. Thicker layers are harder to bite and break unevenly.
- Candy canes: Crush them into small and medium pieces and sift out the fine dust, which can tint the white chocolate pink. Crushed round peppermint candies or starlight mints work too.
- Variations: Swirl the layers while the dark chocolate is soft, swap in milk chocolate, or add ¼ cup of crushed chocolate sandwich cookies with the candy canes.
- Storage: Keep airtight with parchment between layers for up to 1 week at cool room temperature or up to 2 weeks in the refrigerator. Freeze for up to 2 months.
- Nutrition: Values are estimates for 1 piece (1 of 24, about 1 ounce), made with semisweet chocolate.
Nutrition Information:
Yield: 24 Serving Size: 1 piece (about 1 ounce)Amount Per Serving: Calories: 154Total Fat: 9gSaturated Fat: 5gCholesterol: 3mgSodium: 15mgCarbohydrates: 20gFiber: 1gSugar: 18gProtein: 1g